Four Variables of Sax Pad Installation
By Curt Altarac
Before reading this article, you must understand The Two Basic Types of Leaks.
When setting up a saxophone, removing pad leaks is a vital step for good work. Once the saxophone is close to leak free setting the timing (or removing timing leaks) is a simple job. The degree to which you fix pad leaks and remove sloppiness from the mechanism will dictate how long it takes to set the timing and the longevity of your settings. The better your preparation, the easier your job. So understanding how to remove pad leaks is essential for any good repair work.
For the purposes of this article, we will assume that your key work is tight. Excellent key work is essential and will be discussed in a later article. We are also going to assume that there is a sufficient amount of shellac behind the pad to level the pad. If you are attempting to remove leaks from a new instrument, you will soon find that many manufacturers do not use enough shellac (or hot glue) and that bending key cups is your only option. To get the exact amount of shellac needed for a good installation I use the Z-gun.
Installing saxophone pads can be done well if the environment that the pad is going into is a friendly one. Understanding the variables that determine the outcome of your work will help you make educated decisions during the process. You may decide not to address one or more of these variables, and we all decide during the course of our repairs the degree to which we address these variables. None the less, this article will explore all the variables and how to cope with them.
The major variables that effect pad installation are:
1. Tone hole levelness
2. Pad cup levelness
3. Pad levelness
4. Orientation: The relationship of the pad in the pad cup to the tone hole surface.
Note that variations in these variables, such as un-level tone holes, are not often obvious. The pictures in this article are exaggerated for clarity. Volumes could be written on each of these topics, but we'll keep it brief and cover the major operations involved.
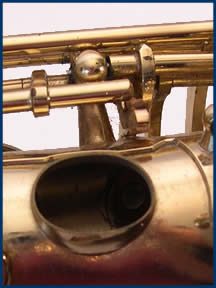
Tone Hole Levelness
Leveling a tone holes is best done with a diamond file on round disc like the Jim Schmidt tone hole files. In our shop, we've discovered that with the correct oil, (UltiMax Medium) the proper RPM's and good pilots, we can achieve superior results using a drill to power the file. No matter what method you use, the results you are looking for are a perfectly flat and smooth tone hole which is free of burrs. To read more about filing tone holes with a drill read this blog entry: leveling tone holes with a power drill.
. .
.
Pad Cup Levelness
Once the tone hole is flat and smooth, it is a good surface for the new pad to seal against. However, if your pad cup is not level, you will have to distort the pad or fight with the pad cup to get the pad seated properly. I have outlined the process of leveling a pad cup in another article: leveling pad cups on a bench anvil.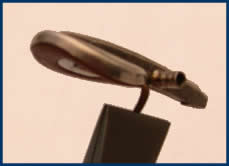
Pad Levelness
Now that you have a flat tone hole and level pad cup, you are on your way to an excellent pad installation. However, this work is useless if you install a lumpy or inconsistent pad. In our shop we install the RooPads and Standard Tan Saxophone pads. Be sure you use a high-quality hand made pad that does not have inconsistencies great enough to cause seating problems. Of course, I recommend our pads, but no matter what pad you choose make certain it is flat.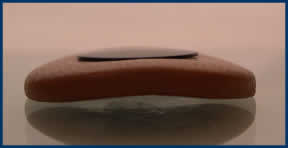
Orientation
Even after all this work, you may still find it difficult to level a pad if the pad cup is not properly oriented with respect to the tone hole. I call the process of aligning the pad cup with the tone hole surface "dry fitting." We essentially pre-install the pad without shellac to correct the orientation of the pad cup to the tone hole. This allows the pad to hit perfectly around its entire circumference. I have written an article specifically about this process called Dry Fitting Saxophone Pads.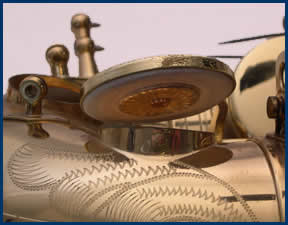
You now have a level pad cup, tone hole and a quality pad. The entire set is also properly oriented and you are ready to install the saxophone pad. Using the same pad that you used to dry fit, you will apply shellac and install the pad. The difficulty of this procedure, much like all aspects of repair, will depend on how well you have dealt with the 4 variables.
If you have dealt with these issues perfectly you will only need three tools to install your pad: a heat source, a pad slick and a pad prick.
Copyright © 2000-2012
MusicMedic.com
All Rights Reserved