Replacing a Needle Spring
By Rich Zimmerman
When replacing a needle spring always make sure there is a substantial reason to replace it. If the spring is not broken or corroded, and it has the desired action when in use, there is no need to change the spring. However, if a spring is rusty or does not hold tension it should be changed. Occasionally springs are intact and the repairer changes them to improve the feel of the instrument's action. This is a job that should only be done by an experienced technician who can predict the outcome based on experience with various materials.
Understanding Blued Needle and Stainless Steel Springs
There are two types of round springs used in most saxophones; Blued Needle (also called Blued Steel springs) and Stainless Steel.
Blued Needle springs are made from steel needles. These needles are blued with heat to make them harder and prevent rust from forming. Even with this bluing, these springs have a tendency to rust. Rusting is a problem for many technicians and players, especially a player that is working outdoors or in coastal areas. Blued Needle springs can be very firm and often only take one bend. Once a blued needle spring is tensioned, re-tensioning the spring may cause it to break.
Good quality Blued needle springs offer more spring action in relation to the diameter of the spring than any stainless steel spring available anywhere at any cost. Blued steel springs are very hard allowing the use of a smaller diameter spring with a greater curve to achieve the same tension. To the player this translates to a more even tension throughout the travel of the key. On many vintage instruments, due to the placement and length of the springs, replacing blued needle springs with stainless steel springs will not work.
Stainless steel springs are used on many new instruments because they do not rust. Unless there is a good reason to do so, always replace a stainless steel spring with another stainless steel spring. Replacing a Stainless steel spring with the same diameter Blued steel spring may cause the spring tension to become too strong or uneven.
Replacing a Spring
Wear safety glasses when removing and replacing springs.
1.Remove the existing spring.
2.Select a replacement spring.
To select the correct size needle spring it is often possible to simply choose the largest diameter spring that will fit into the hole of the post. If the hole in the post is damaged or wallowed out, one must consider this and choose a spring that is appropriate. A spring that that is too large will feel sluggish with increasing tension as the key is depressed. A spring that is too narrow will not have the necessary tension. If you have a caliper you can measure the old spring and start with that size. Occasionally the hole in the post will be too damaged to install the correct size of spring. When this is the case, the post must be repaired to accept the appropriate spring.
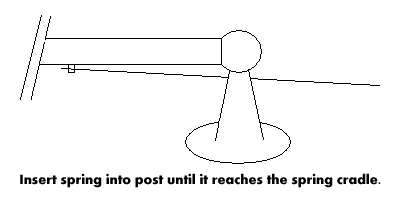
3. Size and trim to length
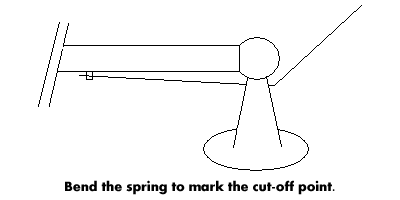
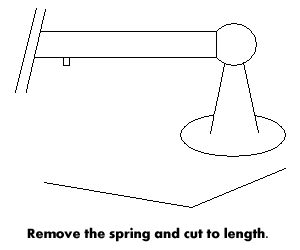
Once you have the desired thickness for your spring insert it into the post. Push the spring far enough into the post so that the tapered end is just beyond the spring cradle on the key. Mark the length of the spring by slightly bending the spring at the post. Or you can mark this with a marker or measure the length with a caliper or ruler. Once you have the desired length remove it from the post and trim it to length with a pair of side cutting pliers. *Safety warning* Blued steel springs tend to fly apart when cut. It is best to cut the spring under a rag or hold it under the bench to avoid injury. Always wear safety glasses when trimming springs.
4. Peening and Fitting
Your new spring will be friction fit into place. Because many springs do not have a flattened end, you must flatten (also known as peening) the end to hold the spring tight in the post. There are two theories about peening springs: Some technicians will hold the cut end in a flame until the end turns gray and then remove it. This will anneal (soften) the metal allowing the spring to be hammered without splitting the end. Other technicians will not anneal the spring because the annealing process, by definition, will soften the metal and decrease the spring rate causing the spring to fail. If possible, it is recommended that the annealing process be avoided. If a spring is too brittle to carefully anneal, it may be too Brittle to use.
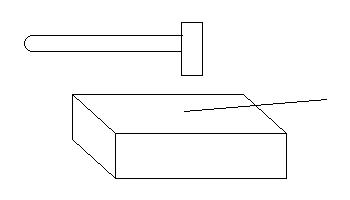
Lay the end of the spring on a Bench Anvil and tap it with a hammer until it tapers into a wedge shape, similar to a flat head screw driver. You can then clean up the edge of the spring by leveling the flattened end with a file or grinder. Note that needle springs are known for flying across a shop during this procedure. This is a dangerous process even when done correctly, wear safety glasses and be sure that the spring is aiming away from you during this peening.
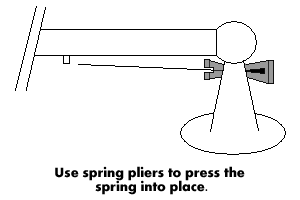
Place the spring back into the post and insert it all the way with flat nose spring inserting pliers. If the spring slides in too easily you will need to remove it and flatten the head more until it fits tight. If the flat end of the spring is too large to be pressed into the post with medium force, start with a new spring and peen it less.
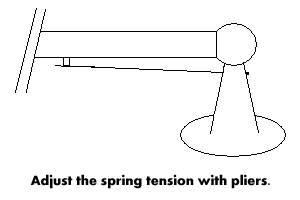
5.Tensioning
Tensioning a spring will give a key its action or firmness when pressed. After replacing the spring put the key back on the instrument if it is not already in place. Look at the key mechanism to determine which direction to bend the spring. Work the key back and forth and note which direction the spring cradle moves. Notice that when a key is pressed you are usually pressing against a spring.
To tension, ( remember to remove the key) bend the spring in a smooth curve in the opposite direction of where it will lay in the cradle. To obtain a smooth curve it is best to use a pair of smooth jawed pliers such as spring bending pliers, round nose pliers or half round pliers. Grip the spring in the pliers at the post, and using a medium twisting pressure, push the pliers down the length of the spring in a straight line away from the post and off the end. This will give the spring a smooth curve and can be repeated as necessary to achieve the desired result. On larger springs, you may need to bend the spring a little at a time working down the springs length. Do not bend the spring right at the post as this will weaken it. When the spring is placed in the cradle and is under tension it should appear straight. Make sure the spring is not touching the key arm or anything else between its cradle and the post where it is fitted.
To test the spring action replace the key and place the spring in the cradle with your MusicMedic.com spring hook.
Copyright © 2000-2012
MusicMedic.com
All Rights Reserved