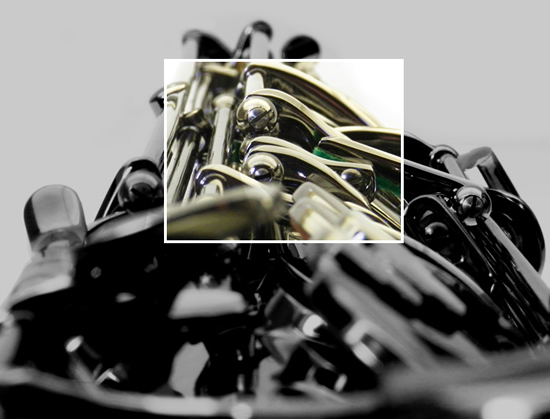
Understanding the Left Hand Table: Part 2
By Curt Altarac
You can find Part 1 of this article here. The job of setting up the modern LH table is simply a series of steps that, if followed, will result in a quick and repeatable setup of the table. However, understanding the concepts involved in the adjustment of this mechanism will help you when poor design or previous work by other technicians find their way to your bench. With its added adjustability, the modern LH table can be a joy to roll around on. Rolling to trill speeds is possible and effortless even without modification on most instruments. Instruments that require very high key heights for the Low B and Bb may need some modifications to perfect the feel. However, in those cases the biggest problem is not likely the instrument itself, but the way the table was set up. The table should be set so it is easy to roll around on and serviceable. Usually this means there are no huge corks, oddly bent tabs, lost motion, or misaligned key touches.
What does a properly set up LH table feel like?
A comfortable LH table is smooth with all of the touches on the same plane or close to it. It's simple to roll, nearly trill, from any key on the table to any other (excluding G#). The distance between the key touches is natural when playing. The player is not reminded of the difficulty of getting around on this table. Low B never 'kacks' even when the C# key is accidentally pressed. The G# opens the right amount no matter which key is used to open it and there is no unintentional lost motion. All this is true and the mechanism is free of noise. To achieve a truly great feel in the LH table, spring tensions must also be set in a logical way. However, spring tensions for these mechanisms will only be discussed briefly in this article. 1. When the above situation is accomplished, the following is usually true: 2. The C# cage is parallel to the face of the C# and Bb key-touches. 3. The G# touch operates the G# pad over the entire range of its motion and the pad opens completely. 4. The tabs on the G# are bent in a predictable manner: slightly back with a large flat contacting surface and a moderate amount of material. 5. When pressing the G# tab via the B or Bb key-touches, the G# pad cup opens nearly completely. 6. When pressed slowly, the B and C# keys experience no drag where the back of the touch rubs on the tab from the G# touch.
Materials:
Choosing the proper materials is an important part of having a mechanism that will feel good and last a long time. It's important to note that most mechanisms can be set up without oddly bent tabs and very thick corks. In fact, when you see these things on an LH mechanism, it is an indicator that someone has bent parts without understanding and it will likely need to be repaired. The properly set up mechanism will have firm, quiet materials with the proper density and lubricity. I will explain the exact materials that I use on this mechanism, however, you are wise to understand why I have chosen these materials. I have some rules which seem to work: I always want a material to hit a material and never use the bare surface of the key or body. With that, consider that keys either bump, slide, or bump and slide. When they bump, I want something soft to take the impact yet remain stable. For this I use Tech Cork covered with Ultra-Suede hitting Ultra Suede. When they slide, I use something slippery like Teflon sliding on Teflon. When the keys bump and slide, I use something slippery on one side and something soft on the other such as Teflon and Ultra Suede. Your choice of materials on the sliding levers and Bb cage will be particularly important as these parts need the right materials to function properly, because they are part of the mechanism and not only for quieting and adjustment. With that, sometimes we modify the mechanism to work with the materials we want on these keys. For example, the material on the sliding levers must be smooth and quiet (bump and slide). However, manufacturers often don't allow for enough material to accomplish these goals. Simply adding material will cause your sliding lever to lose its ever important parallel configuration with the key it contacts. In these cases, it may be necessary to modify the round slider or replace it with a smaller one. To fully understand that concept, you must understand the sliding levers.
Sliding levers:
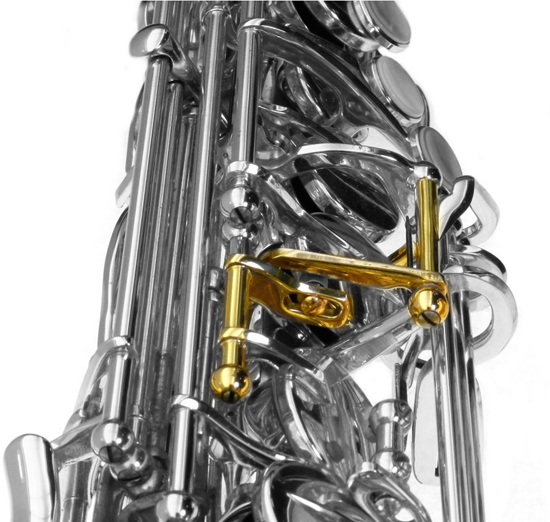
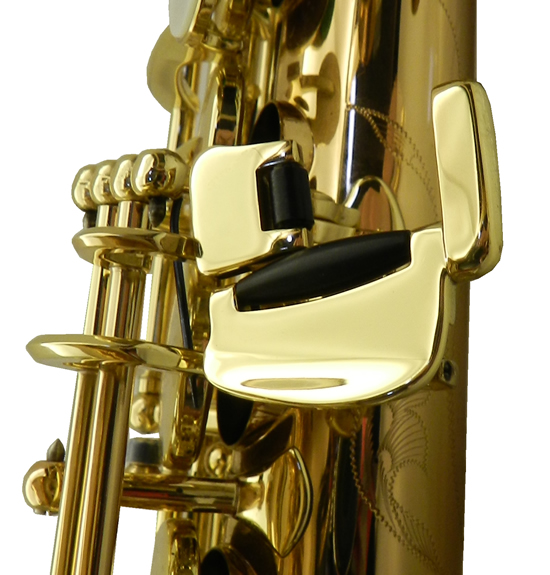
When you set the G# (and later the low C#), you will be adjusting a sliding lever. This sliding lever is your connection from one key to another where the two keys operate on separate and opposing fulcrums. The sliding lever alters the mechanical advantage between keys. The resulting advantage or disadvantage is usually created to change the relationship of travel between a given key touch and its corresponding pad cup. You must understand this concept thoroughly and be able to predict how moving the small adjustable slider will affect the key touch and pad cup relationship before you proceed. A thorough understanding is especially important when the contacting surfaces are not parallel. Thus, moving the slider will change the amount of movement of the key-touch in relation to the pad cup as well as the starting (or resting) position of the key touch itself. Basically, the travel in your C# and G# key touches and their resting position will be set by the B and Bb key touches. Sliding levers are only there to adjust the amount of pad opening in relationship to the fixed amount of key rotation. Understanding that last sentence is your key to setting up the left hand table. So I'm going to say it another way: When the sliding lever and the contact are parallel this adjustment is simple, you only need to set up the table to work without lost motion, then adjust two sliding levers. The sliding levers should not change the position of your key touch and thus not cause a need for a "back and forth" type of repair. When they are not parallel, one must adjust motion with the lever, then bend the mechanism.
To achieve a predictable, stable, and serviceable LH table, the technician should first make certain that the sliding lever and the corresponding surfaces are parallel before adjustment begins. In the image above you can see the G# lever and the slider's adjustable path are parallel. As some instruments are not made this way at the factory, getting to this parallel state can be various degrees of difficult. Rest assured that the nonparallel(ness) of these parts is not a thoughtful consideration by a manufacturer; it is an oversight and should be corrected when possible. Methods of correcting (making parallel) this mechanism include: replacing the material with the appropriate thickness, bending key arms into position, replacing the round slider with an appropriate thickness, and key fabrication. With the proper materials in place and all sliding levers parallel your job will be fairly simple.
Contact between the fulcrums:
When you are bending, soldering, or replacing material to get your sliding levers parallel, you should also consider where these contacts meet in relationship to the two fulcrums. More so in the low C# connection these levers are often bent by technicians, over time, to a location that is far from ideal. In the resting position, the C# key touch should contact the C# pad cup between the two fulcrums. If the contact is too far above the fulcrums there is a mechanical disadvantage placed on the mechanism and the spring tension of the C# key will need to be increased to compensate.
Leave a little room to crush.
Up to this point, we have talked about using the mechanics of the saxophone and basic levers to our advantage. The adjustments, although somewhat difficult, are simple to understand. There is one adjustment in this system which is not mechanically intuitive yet results in markedly improved response and tone in the low B and Bb. That adjustment is between the Low B key and the G# lever. Some buttons you press, directly close a pad (or two) on the saxophone. In those instances, the size of the tone hole rim can be important to the way the instrument plays. When a tone hole rim is very small, the pressure of your finger is transferred to a relatively small surface area. However, when the tone hole rim is very large, the pressure exerted by your finger is spread over a much greater area. For larger tone holes, more finger pressure is needed to achieve the same pressure over the entire surface of the tone hole. This is important with B and Bb as they are the largest tone holes on the body and any air leakage here will result in poor response of these tones. The B key has a tab that presses the G# lever. The G# lever has a foot that contacts the body. In a dark room a technician may press the B or Bb and watch the pad seal completely at the same moment as the G# lever foot contacts the body. To the technician this appears to be mechanical perfection. The keys hit simultaneously and the pads do not leak. To the player, this will result in an instrument where low B and low Bb do not speak well. To counter this, it is wise to have the Low B and Bb pads close before the G# lever foot touches the body. That small bit of space will allow the player a bit of 'crush' on the low B and Bb pads to counter the pressures coming from the bore. Note that this same concept travels into the G# pad and the set up of both the upper and lower stack; but that's a topic for another article! To set this 'lost motion' I use Ultra Suede as a feeler gauge under the G# foot. The foot hits the feeler at the same time the low B and Bb pads hit their tone holes. When the feeler is removed the proper amount of 'crush' is left in the LH table. Ultimately that amount of 'crush' will be decided by the instrument during the play test.
Consider that the G# lever now has two positions it will be pressed in. If the lever is pressed directly, it will move its entire rotation. If it is pressed by the tab on the B key, it will move its rotation minus the thickness of our feeler. With the sliding lever's adjustments, it's possible to set the G# to open fully when pressed by the Low B, but that will leave a little lost motion at the end of the travel when the G# lever is pressed directly. It's also possible to set the mechanism so that the G# lever opens the G# pad completely without lost motion, but that will cause the G# pad to open less than fully when pressed via the Low B touch. The latter scenario is the one I prefer and will outline here. The amount of travel lost at the pad when the G# is pressed by the Low B touch should be nearly insignificant and unnoticeable to the player. However, any lost motion at the end of the travel of the G# key will be felt in the players hands and will give an unstable feeling to the mechanism.
Four touches, two are adjustable.
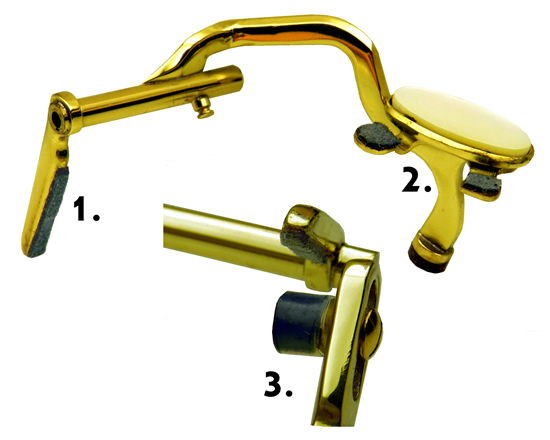
Note that the LH stack consists of four key touches, two of which are adjustable. The Low B and Bb keys are not adjustable in the relationship between key touch travel and pad opening. In fact, on these keys the parts are soldered together and rotate on the same fulcrum. Because of this, the travel of the Low B and Bb will dictate the travel (but not necessarily the pad height) of the C# and G# key touches. Further, the G# key is pressed by the B key and that clearly dictates the G# travel. The C# key travel is dictated by the travel of the G#.
Step 1. Apply Materials
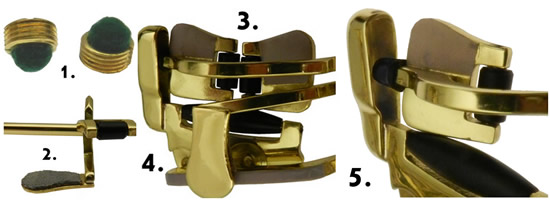
Keys should have materials applied before assembly. At the MusicMedic.com Sax ProShop we are currently using the following materials on the B and Bb keys:
1. Bumpers in the key guards cut to a domed point.
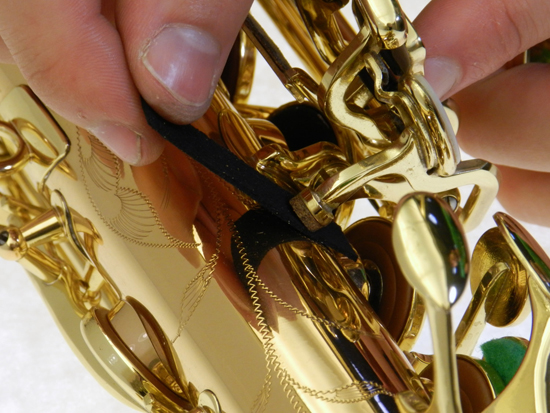
2. Contact tab from B to Bb: .8mm tech cork with gray Ultra Suede.
3. 0.003" Teflon sheeting applied to the backs of B and C# touches where contact is made with the G# tab.
4. 0.003" Teflon applied to the back of the hinge arm on Bb key touch where contact is made from B tab.
5. A combination of hot glue filled shrink tubing and Teflon heat shrink tubing here the Bb rocker and the C# key connect.
We are currently using the following materials for the G#:
1. 0.6mm tech cork covered with gray Ultra Suede on the G# arm.
2. 0.4mm tech cork covered with gray Ultra Suede on the G# tabs.
3. The adjustable sliders for C# and G# should have the same materials (we use a hot glue heat shrink tube covered with Teflon heat shrink tube).
Step 2: Install the Low B and Bb.
The Low B and Bb keys must be set first and you will need a way to decide on their key heights. I figure out the pad height for low B and Bb by using the Balanced Venting Method. The motion of the Low B and Bb touches will now dictate the set up of the rest of the table. Once you have these key heights, you can begin setting up the table. Put the Low B and Bb keys on the instrument, remember that the pad heights will dictate how easy it is to travel around that table. If the Low B and Bb keys are very high, the Low B key will travel quite far, making it difficult to roll from B to Bb and later to and from C# when that key is put on the instrument. Set your B and Bb pad heights as low as you can to allow for smooth mechanical function with a good tone. The Low B and Bb keys should be set where the key touches are parallel and both pads close at the same time.
Step 3: Set the G# Touch.
 The G# key is part of two mechanisms. One allows the G# pad cup to be independently operated by the G# key-touch and the lower stack keys; this is called "articulated". The articulateness of the G# is the reason you are able to close the right hand and also press the G# key without opening the G# pad. A second mechanism allows the G# to be pressed by a tab that extends from the back of the G# touch to under the B, Bb, and C# key-touches. This is called "tabbed"; thus, when G# is pressed by way of the Bb key, it is called "tabbed G#." The travel of the G# key touch will govern the travel of the C# touch. So, the next key to install is the G#. The G# touch will have to move a little more than the low B touch to allow for the 'crush.' In their resting positions, there will be no lost motion between the B key and G# tab. For ease of understanding, remove the G# pad and place the lever on the instrument. The G# touch should be resting under the B key and the arm that contacts the pad should be floating where it will contact the G# pad eventually. Place your feeler under the G# foot on the body and press the G# lever by way of the B key touch. The G# lever foot should contact the feeler at the same time the B pad hits the tone hole. With the feeler removed, you now have the complete travel of the G# lever set.
Step 4: Install the G# Pad.
With the travel of the G# lever determined, you can place the G# pad on the instrument and adjust the parallel sliding lever so the G# pad opens fully when the G# lever is pressed. If your parts are parallel, this adjustment will not alter the location of the G# lever in relation to the other keys on the table and the adjustment will be simple. If your contact between the G# touch and the G# pad is directly between the fulcrums your spring tension set up will be easy and predictable. When the G# lever is pressed via the B key touch, the G# pad will open nearly all the way, minus the thickness of the feeler. As you become accustomed to this method of setting up the LH table, you will find that removing the G# pad when placing the lever on the instrument is not necessary. Until then, do not skip this step.
Goals up to this point:
*The G# tab will contact the back of the Low B key-touch and the G# pad will be held closed with no lost motion. * Pressing the G# key-touch will open the G# pad cup fully. * The Low B and Bb pads will close and seal when the foot on the G# is the thickness of the feeler gauge away from the body. * The G# will feel good under your finger when pressed with no "bumps" of lost motion. * The Low B will have a similar feel and pressure to the G#. * The Low Bb will have a reasonable spring tension. And rolling from B to Bb (and back) will be comfortable.
Step 5: Set the C# Key Touch and Pad Travel to Match the G#.
When you have properly set up the C# key-touch and pad, the following will be true: The C# key-touch will travel the same as the G# key-touch with no lost motion. The C# key-touch will open the C# pad cup the desired amount. The C# key-touch will open the G# pad cup completely. As you become more familiar with the LH Table set-up, you will have the C# key touch and C# pad cup installed already. However, for ease of understanding, the C# should be put on only at this point in order to avoid confusion when setting the G#. 1. Place the C# key-touch and the pad cup on the instrument. 2. Note the location of the C# touch in relation to the Low B and Bb key. Check that the cage is parallel and the materials are all working as intended. If the sliding lever between the C# lever and pad cup connection is parallel but the C# touch is in the wrong position relative to the table, bend the C# lever to change its resting position. 3. Now that the travel of the C# key-touch matches that of the G# key-touch, adjust the slider so that the C# pad cup opens the desired amount to be determined by play-testing and mechanical restrictions. Make your adjustment so that the C# pad cup opens fully at precisely the same time as the G# key foot contacts the body. Unlike the Low B and Bb key-touches which correspond with pads closing, the C# key-touch opens a pad and as such, needs no lost motion or 'crush'.
A note about springs:
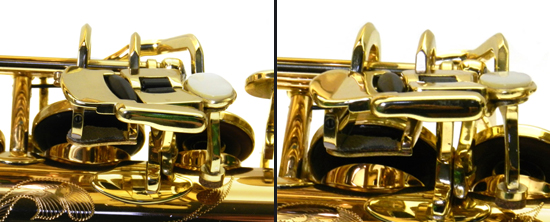
I have left out information on spring adjustment but this is crucial to key function and feel. It's difficult to talk about spring tension on an instrument as there is no unit of measure which is standard. Spring tensions must be discussed relative to the other keys in the mechanism. The spring on the G# pad cup must be strong enough to quickly open and close the G# pad even if some sticking occurs. The G# lever spring must be heavier than the opposing spring on the G# pad cup sufficiently overcome it. The spring on the Low B needs only be strong enough to open it with some force, but not snap it open. In most cases, the Low B Key spring will be aided by the G# lever spring which is heavy. The Low Bb spring should be sufficient to open the pad quickly. This can be checked by trilling between the Low B and Bb. The Low C# pad and lever have a different spring configuration on different instruments. Most often the pad spring must supply sufficient pressure to open the pad quickly even when there is some sticking. The C# lever spring must be sufficient to overcome this. Bb cage out of alignment and Bb in proper alignment, parallel to the LH table.
Variations of the Modern Mechanism.
By following this method, you have now set up the LH Table in a predictable and consistent way. This is the most basic set-up for this modern key configuration. Because I often find these keys to be improperly set up with excess materials, key travel, and wildly bent key work, I think it is necessary to start with the basic set-up of these keys and achieve consistent results first before attempting any variation in the set-up process. There are other set-ups that you may choose in special circumstances. How you will choose each set up depends on the configuration and shape of the key touches and your ability to feel the subtle differences when moving from key to key. Although there are many ways to adjust this mechanism, there are two set-ups, aside from the basic type outlined above, that I often use. To distinguish between these two alternate set-ups, I call them "C# High" and "B High". These two methods have the respective key touch sit higher in their resting position. Each variation is meant to accomplish a good feel for particular instruments that would not be optimally set up with the Basic Method. A further discussion of this, spring tension, anomalies in the system, and modifications needed may come in future articles. At this time, be aware that some (but very few) instruments will be better set up by modifying the method above. Good luck! - Curt Altarac
Copyright © 2000-2012
MusicMedic.com
All Rights Reserved