Understanding the Left Hand Table: Part 1
By Curt Altarac

Over the course of many years of working on both vintage and modern saxophones, I have found that the Left Hand Table (LH Table) is a sorely misunderstood and abused mechanism, and that players and technicians alike assigned magical qualities to its functioning rather than scientific methods. This article, in two parts, will explain the evolution of the Vintage LH Table over time and how it differs from the Modern LH Table. Part two, which will be in the next issue of MusicMedic.com's Bench Notes, will describe the process of setting-up the Modern LH Table.
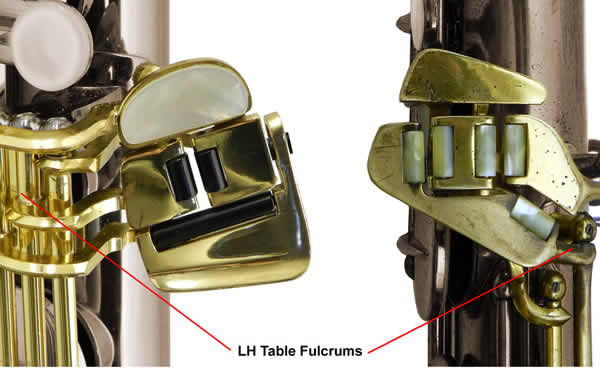
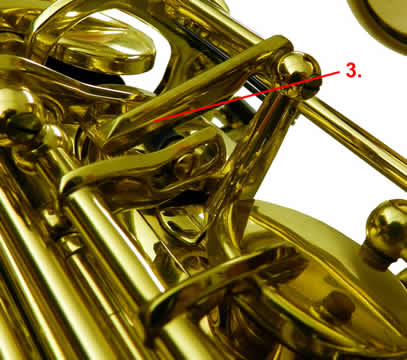
The Tables Have Turned: The Modern fulcrum is to the left of the LH Table; the Vintage fulcrum is to the right of the LH Table.
Before we discuss setting up the Modern LH Table on the saxophone, it's important to understand its counterpart, the Vintage LH Table: how it works, its limitations, and its evolution into the Modern LH Table. The fundamental difference between the Modern LH Table compared to that on older horns such as the vintage American saxophones like Buescher, Conn, Martin, etc., is the rotation of the keys. Vintage instruments were made so that all of the keys rotate in the same manner as the player's hands (with the exception of the G# on some models). The fulcrum for each key touch (C#, B, Bb, and G#) is closer to the player's palm while playing and the LH Table key-touches are further from the player's fingertips. On modern instruments, the opposite is true. The fulcrum for these keys is located in front of the keys, closer to the player's fingertips and further from the palms.
Benefits of the Vintage LH Table.
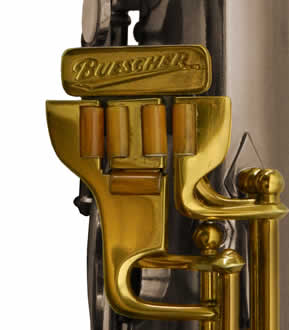
On some vintage saxophones, C#, B and Bb are 'Inline', or arranged in a horizontal configuration.
There are many variations on the Vintage LH Table and certainly a lot more substantial changes were made to it than those made to the Modern LH Table since its inception. Discussing the pros and cons of the different Vintage LH Tables might take too much explanation to be a useful discussion here, so in short, most Vintage LH Tables share the same benefits. First, the feel of the Vintage LH Table is preferred by many players. To the player, one major advantage is the inline C#, B, and Bb touches. On some vintage LH Tables, the player can move from C# to B and continue horizontally in that same path to play Bb. Conversely, on modern instruments, the Bb is located below the C# and B touches. Another benefit of this configuration is that the Low B and especially the Low Bb keys on Vintage LH Tables are very easy and comfortable to press. On many vintage instruments, even the low C# is comfortable to press. The Vintage LH Table is also advantageous because of its simplicity and quiet action. Since there are no bridge mechanisms in the Vintage LH Table, the action and rotation of these keys is simple, predictable, and easy to silence. This simplicity allows technicians to set Vintage LH Tables for years with quiet and virtually trouble-free use.
Disadvantages of the Vintage LH Table.
On vintage instruments, the fulcrums for the LH Table keys are in-line. Some keys, such as Low C#, have a key touch that is very close to the fulcrum for that key. This makes it more difficult to press as the short arm offers very little leverage. While the short C# key-touch arm can make it difficult to move the long spine and pad cup arm located much further from the fulcrum, the opposite is true for the Low Bb. On vintage instruments, the Low Bb key-touch is very far from the fulcrum of the key. As such, the key-touch moves further and thus the key feels lighter to press, as work is spread over a longer distance. This inherent problem of difference in feel between the C# and Bb keys presents a dilemma for both the technician and player, and the solution tends to be a matter balancing feel and function.
Another disadvantage with the Vintage LH Table is the direct connection between the key touches and the inability (without modification) for independent adjustment of pad heights or key travel. For example, you see that the C# touch is directly connected to the C# pad cup, and thus the movement of the touch is dictated by the necessary height of the C# pad cup. Because the movement of the C# touch is directly related to the movement of the other keys on LH Table, the technician and player are forced to compromise between feel and function.
Just as the C# key-touch is directly connected to its pad cup, the same is true for Low B and Bb. Viewing these keys off the instrument, as shown in the photo above, makes it obvious that the travel of the key-touch is directly related to the travel of the pad cup. Further, since the Low B and Bb pad cups have to be open the same amount in order to close at the same time without lost motion, the key-touches are not only fixed in their movement on one key but between keys. That is, the travel of the Low Bb pad cup will ultimately dictate the travel of the Low Bb and B key-touches. The in-adjustability of these keys forces the technician to make compromises between intonation, feel of the table, and mechanical considerations (such as eliminating lost motion) in order to align the Low B and Bb key-touches (set to travel together and by pad height) with the C# (travel set by pad height). If no compromises are made, the technician may be setting up a situation where it's not possible to travel quickly from touch to touch on the LH Table or where some tones are sacrificed due to incorrect pad height.
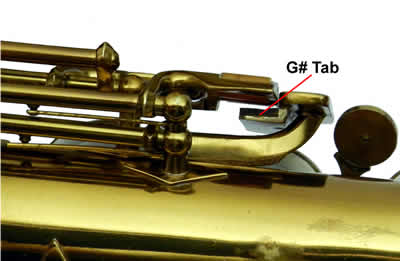
Mechanism Evolution: Adding a Tab to the G# on the Vintage LH Table.
On later vintage instruments, tabs were added to the G# Touch to enable the player to play the tone G# by pressing any of the key-touches on the LH table. This addition allows the player to play from B to G#, Bb to G#, C# to G#, and back, without moving the left hand pinky finger. This new "Tab" that connects the G# to the other LH Table keys is very useful for a player but it adds a difficulty and further compromises to the technician's job. For instance, adding the tab between G# and C# adds the spring load from the G# key to the C# key. As we discussed, the C# Touch is already a difficult lever to press, and this problem is compounded by the addition of the tabbed G#. This is a problem that technicians work to minimize with varying degrees of success. Further, a tab that is placed under the Low B and Bb key-touches (remember these keys have to move the same amount) links them to the movement of the G#. With the B and Bb linked to the G# and the C# linked to the G#, all of the LH Table keys (C#, B, Bb, G#) must now move the exact same amount (on their rotational plane) if no lost motion is desired. Because they are directly connected to their pad cups, no adjustments can be made; only sacrifices.
Some technicians find that this limitation makes set-up easier: once you have set the motion of any key in the LH Table, you know how much the rest of the keys will move. The only decision which must be made is which key or keys will dictate this motion. Other technicians find this limitation makes set-up very difficult: one is forced to set up the key heights for the entire table together without any ability to adjust keys independently.
Introducing the Modern LH Table.
When Selmer originally came out with the design of what I refer to as the "Modern Mechanism", this change represented a big shift in saxophone key design and solved two main problems. First, it allowed the C# and G# key-touches to be adjusted independently of their respective pad cups. Second, it evened the feel (pressure) between the keys on the table.
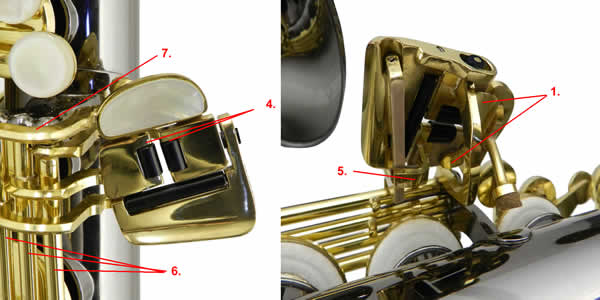
Two big design changes in the rotation of the entire table and the location of the fulcrums make this all possible. The Modern LH Table rotates in the opposite direction as its counterpart, the Vintage LH Table. It rotates opposite the movement of the fingers with the fulcrum further from the player's palm. See above photo. Second, the fulcrums on the Modern LH Table are not in-line or stacked like some Vintage LH Tables. The fulcrums are set parallel to the body in a line that moves away from the table. This change gives each of the touches in the LH Table a similar feel and distance from their fulcrum. This is easy to see when you look at the picture above. Note the fulcrum for the C#, which is the furthest for the fulcrums is also the first fulcrum in the row of keys. The low B and Bb are next. Low B has less spring tension than low Bb (Bb spring tension=(B spring+Bb spring). So, the low B key is the next fulcrum. The next fulcrum, Low Bb, has a long key arm that gives the player leverage when pressing the Bb key.
This Modern LH Table has the following characteristics:
1. The G# is tabbed to the C# and B Touches.
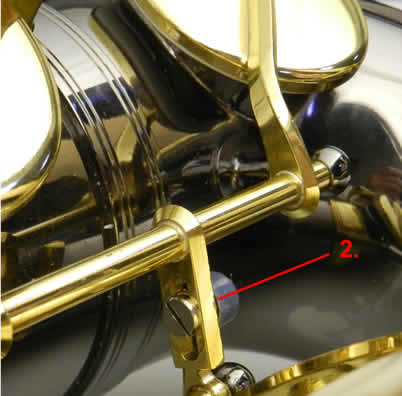
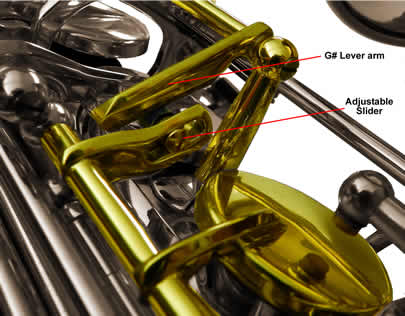
2. The C# key has an adjustable slider which allows the technician to separately set the travel of the C# pad cup and the C# key-touch.
3. The G# key has an adjustable slider which allows the technician to separately set the travel of the G# pad cup and the G# key-touch.
4. Only the C# and B key-touches are aligned horizontally with one another; the Bb is no longer in-line.
5. The B is linked to the Bb via an adjustable tab that extends off of the B key-touch and contacts the underside of the Bb key-touch.
6. The Modern LH Table rods and hinge tubes are centered over the bottom stack.
7. Each key-touch for G#, B, Bb, and C# is set on a separate fulcrum and these fulcrums are not stacked on top of each other but travel away from the touches.
Today, this LH Table is favored by all major saxophone manufacturers. It is vastly more adjustable than its predecessors and begs the questions: why do many saxophonists with modern instruments still have trouble using the LH Table and why do technicians struggle with the Set-Up of this mechanism?
Likely, the root of the issues stems from the additional complexity. A situation was created where key heights could be set independent of key-touch travel on C# and G#, which adds several more variables that must be understood rather than adjusted only for “feel”. With a knowledge of this mechanism, where and how it is adjustable, and how it functions as a whole, the technician has the flexibility to set (somewhat independently) the feel, key travel, and the starting & stopping points of key-touches in relation to other key-touches on the LH Table.
Considerations Before Setting-Up a Modern Left Hand Table.
When talking to many technicians about how they set up a LH table on modern saxophones, you will often hear responses that resemble, I tweak a little here, then here, then try here and eventually I 'get it'.
This “trial and error” method for the set-up of a LH Table is in stark contrast from the known system for setting up, for example, a Right Hand stack that these same technicians use. But why? Is it really something that cannot be explained or must be done by "feel”? Why are the final outcomes of this tweaking not always the same from technician to technician and even within various instruments of the same make done by the same technician? The confusion lies mostly in the adjustable mechanisms around the G# and C# pads. A combination of poor manufacture by some makers and poor understanding by the technician result in a poorly set-up LH Table with improper outcomes.
The adjustment screws related to the C# and G# pad cups were originally intended to change the amount that the pad cup can open, independently of the key-touch. When two parts such as the C# key-touch and the C# pad cup work together and their fulcrums are opposing, it is very simple to change the relationship between the two. When the contact is in the center of the two fulcrums, any movement of one key touch will equal the movement of the pad cup. As the contact moves further from the center, one side is given a mechanical advantage as the opposite side's advantage is lessened. Since the total travel of the touch is set, the result of this is more or less motion in the pad cup with the same motion in the key-touch.
Parallel Sliders.
In theory, this adjustment is excellent. It gives the technician the ability to open a pad further without altering the amount of travel in the touch. Conversely, it allows the technician to change the travel in the touch without changing the pad height. The problem that one finds in setting-up this mechanism is this: the two contacts from the pad cup and the key-touch must be parallel to function exactly as stated above. As of late, manufacturers have taken to offsetting these contacts (making them no longer parallel) while continuing to supply a sliding adjuster. Also, technicians often adjust by "holding this part and pressing that part" to bend keys on the instrument. The result from this bending is that the sliding mechanisms are no longer parallel. In these instances, when the slider is moved to change the contact location between the two key fulcrums, not only does the amount of travel in the key-touch change, but the location of the key-touch changes as well. This slight change imparts a great deal of complexity into adjusting the mechanism; an adjustment that nearly always requires bending to set the touch location. This bending further confuses the issue.
This would not be the case if these two parts were made parallel and kept parallel. Most often, simply replacing the sliding mechanism that is too large with a smaller part or altering the material on the key arms will allow the two opposing arms to be parallel. In some instances bending is necessary. Of course, when the key was manufactured with non-parallel adjustable sliders, a bit of re-manufacturing is necessary. An understanding of these sliding mechanisms and how they function will be a major factor in the success of the LH Table set-up.
Understanding how the LH Table keys work together and what they have evolved from will give you a more vivid understanding of the mechanism as a whole. Because you now know that the vintage LH table is set so all keys rotate the same amount, you must consider that this is not true for the modern LH table and thus the set-up for modern instruments will necessarily be approached in a different manner. Knowing what groups of keys must travel the same distance, which are related, and which are adjustable will guide you as you set up the Modern LH Table. The flexibility that the Modern LH Table affords the technician also adds some complexity and the option of making the correct or incorrect choices. Part 2 of this article will take you through the steps of setting up the Modern LH Table in a way that leads to consistent results in both feel and response. With some adjustment, most (if not all) of the Modern LH Tables you set up can have an even feel with the ability to roll (not lift or tilt) the tip of the LH pinky finger freely between C#, B and Bb.
Stay tuned for Part 2: Setting Up the Modern Left Hand Table, in the next issue of MusicMedic.com's Bench Notes!
Copyright © 2000-2012
MusicMedic.com
All Rights Reserved