Tuning a Saxophone with Crescents
By Curt Altarac
When to Tune a Saxophone
As a performer and repair tech, I often play several saxophones of the same make and vintage, only to find that each instrument has very unique intonation tendencies. If these intonation tendencies were design flaws, they would be consistent among saxophone of the same design. I believe these tendencies are actually manufacturing variations and should be compensated for whenever possible.
When adjusting the intonation of a saxophone, consider the ability of the performer to physically adjust the pitch. If the performer does not use a tuner to test pitch or has little ability to hear pitch discrepancies, then there is limited value in tuning the instrument. In this situation it would be better for the player to map out the instrument on a tuning chart, and attempt to play in tune using player adjustments. Only when this type of adjusting proves to be inadequate should you consider altering the instrument.
All of the tuning work discussed in this article is 100% reversible. If the player is unsatisfied with the adjustments, the instrument can be restored to its original state. In our shop at MusicMedic.com we use other tuning methods than those outlined in this article, and some of these tuning methods are not easily reversible. Instrument modifications require the consent of the player. As you work, use your ear to make decisions about tone and intonation. This article is a general guide for you to get an idea about the effect of crescents. If you have trouble hearing slight timbre changes, or do not trust your own judgment, ask a friend for assistance. If you are up to the challenge remember that a tuner is essential for adjusting the intonation of your instrument.
Understanding Crescents
Before you begin tuning a saxophone it is vital to set the key heights properly. Good key height adjustment will give you the best tone and intonation possible. Once you have achieved the best possible key heights, you may want to add crescents to do the final tuning. If you are uncertain how to set the key heights on a saxophone, please read my article regarding key heights which will appear in the next issue of "The Saxophone Aspect."
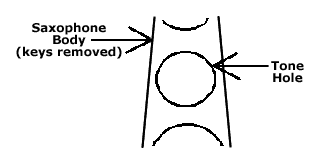
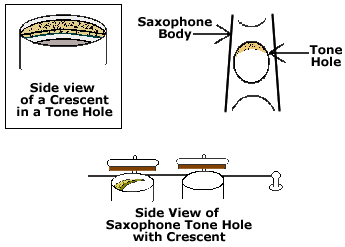
On a saxophone, tone hole placement is crucial to the pitch of the note that comes out of that tone hole. The pitch produced by a tone hole is determined by the length of the instrument from the mouthpiece to the top of that tone hole (the top being the side of the hole closer to the mouthpiece). If the top side of a tone hole were a little closer to the bell, the pitch of the note it produced would be lower.
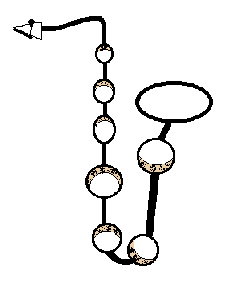
By placing a crescent on the top of the tone hole, you are in effect moving the top of the tone hole farther from the mouthpiece. This makes the instrument longer from the mouthpiece to the top of that tone hole and lowers the pitch of the note, or notes, that come out of that tone hole. Once you understand this principal, there should be no confusion as to where in the tone hole to place the crescent. The diagram below illustrates proper crescent placement. Take note of the crescent placement in the tone holes on the bell and around the bow. The crescents are all closest to the mouthpiece, lengthening the body tube of the instrument to that tone hole.
Not only does the crescent move the tone hole, it also decreases the diameter of the tone hole. Decreasing the diameter of a tone hole has an effect on timbre. Moving the top of the tone hole changes the pitch. Because of this, I never recommend placing a ring all the way around the tone hole. This will make the tone unnecessarily covered and stuffy. Only place a crescent on the top side of the tone hole. If your goal is to add resistance to a tone, use key heights and not crescents to adjust tone.
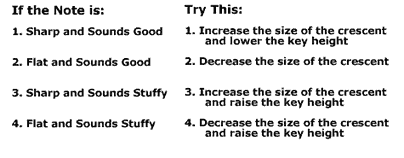
Consider a note that is stuffy yet in tune. This is a common problem as intonation is traditionally adjusted with key heights alone. Remember that a key?s height effects the timbre of a note more than the crescent. If a note on the saxophone is sharp, the common remedy is to lower the key height, bringing the note down in pitch. This compromises the timbre of the note, resulting in a note that is in tune yet stuffy and resistant.
To properly repair this common problem, raise the key height to increase venting. Raising the height of the key will improve the tone of the note. However, with a more open key height our once in-tune note will become sharp. By making the note sharp, we can now lower its pitch with a crescent. Adding a crescent will bring the pitch down without sacrificing the improved tone. The result is a note that is in-tune and 'in-tone.' Placing a crescent in a tone hole also brings the octave intervals of the corresponding note closer together. For example: Adding a crescent to the D tone hole (under the low C pad) will lower the second (third Line) D more than the first octave D. The result is a less spread octave. The reason for this is twofold. First, adding a crescent in effect widens the bore at the area where the tone hole is located. This is an easy principal to understand if you consider that the most important portion of a saxophone tone hole is the very top. Moving the top of the tone hole further from down the cone results in a larger cross section of cone in the area where the top of the tone hole is. Second, moving the top of the tone hole further from the mouthpiece increases the distance of the octave pip to the tone hole. These two subtle changes result in a narrowing of the octave.
Applying Crescents to the Palm Keys
I have had great success when using crescents in the palm keys on saxophones. Because the palm keys are usually used in only one register, altering the pitch of these notes does not effect notes in other registers. Before any tuning is done on the palm keys, be sure to check that the key heights for the top and bottom stacks are set properly.
Assume that the palm D is sharp. Adding a crescent to that tone hole will bring the pitch down as will lowering the height of the key. First, try lowering the key height while you play. Once the tone begins to suffer, open the key height a until the feel and timbre of the note are what you want. Set the key height there and check the intonation of the D then add a crescent if necessary. Once the D is in tune with a good tone, move up to Eb. Now that you have changed the palm D, check the Eb for timbre and pitch. Adjust the key height and add crescents as necessary. Continue this procedure up to the highest tone hole on the saxophone.
Once you are satisfied with the pitch and timbre of these notes, play your instrument. Listen as you play and write down how much adjustment is still necessary. In my experience, altering a tone hole is a long process. I generally need to play the instrument and make small adjustments, completing several intonation charts over the course of a few weeks, before I am satisfied with the improvements.
Once key heights and crescents are in place the palm keys should play very well in tune. To maintain the intergrity of these adjustments it is important that we use a firm material such as TechCork on the palm key feet. The use of materials such as cork will prove ineffective as the cork will compress over time and keys height adjustments will change.
Installing a Crescent in a Tone Hole
The tuning chart is a vital source of information while tuning. It is very important that you complete a tuning chart before attempting any tuning procedures on a Saxophone. I highly recommend that your first tuning procedures be done on key that is not located on a stack. Keys that operate free of other keys without actuating levers will be much easier to understand. Although placing a crescent on your saxophone is not a very difficult task, it will require the removal and replacement of a key as well as time and patience.
Be sure that you have read and understand all of the instructions below before you begin.
The Process
1. Remove the key that is associated with the tone hole you would like to alter.
2. When the key is removed carefully clean the inside surface of the tone hole with a mild detergent or Denatured Alcohol and a soft cloth. This will ensure that the adhesive forms a strong bond.
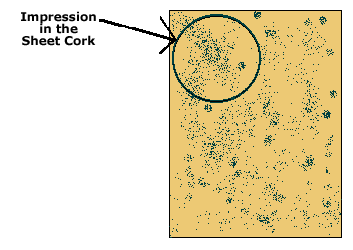
3. With firm pressure, press a piece of 1/16" Sheet cork on to the tone hole. This will leave a ring impression in the cork that will act as a cutting guide for you.
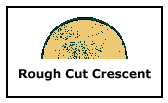
4. Using a sharp blade, carefully cut out one half of the ring in the sheet cork. Check that this crescent is the appropriate size for the tone hole; alter as necessary.
5. Using sand paper, a sanding-board (nail file) and/or a knife, shape the cork into a crescent. Do not remove too much, you will be able to further shape the cork when it is installed on the saxophone.
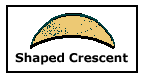
At this time you will also want to level the edge of the crescent that touches the tone hole using a sanding board and/or a piece of sandpaper. This will increase the contact surface between the cork and the inner edge of the tone hole.
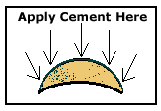
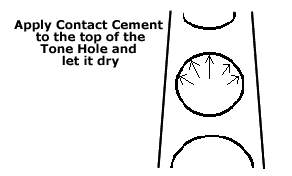
6. Apply a thin coat of contact cement to the outer edge of the crescent. Be sure that this surface is clean and flat. Once the cement is applied, put the crescent aside and allow the contact cement to dry. Using a cotton swab, apply contact cement to the inside-top of the tone hole. If any cement should come in contact with the rim of the tone hole, wipe it off with a rag.
7. When the contact cement is dry, gently press the cemented area of the crescent into the cemented area of the tone hole. Be aware that the moment these two surfaces touch, a strong bond will form. The crescent should be recessed in the tone hole to avoid any contact with the pad when it is replaced. If the crescent impedes the function of the pad, it will need to be removed and a new one inserted. See illustrations below for proper placement of crescents.
Adjusting the Crescent
Once the crescent is in place, it will need to be adjusted. Play the instrument to warm it up for 20 minutes. Complete a tuning chart, number and date it. Now, check this chart against your initial chart. If the note you are trying to correct is now in tune, you are lucky! If not, you can begin to adjust the crescent.
Take time adjusting the crescent and do not try to make it perfectly in tune right away. Some of the natural adjustments that you make when you play will effect the intonation of this note. Give your embouchure time to adjust.
To decrease the size of the crescent once it is installed, gently sand the crescent. You can sand the crescent by wrapping a piece of sand paper around a pencil leaving the course side exposed. With a sawing motion carefully remove cork from the crescent.
You can also round the end of a sanding board (course finger nail file) by creasing it around the corner of a table or a around a pencil. Once shaped, the sanding board can be used to sand the inner edge of the crescent.
Advanced Tuning with Crescents
Using the techniques described in this article, you should be able to successfully lower any sharp tones on your saxophone. As you become more skilled using crescents and understand this type of work on saxophone, you will see how lowering certain pitches will raise others. For instance, lowering the tuning note of a saxophone will effectively raise the pitch of the rest of the instrument. If we lower the note we tune to (usually F), we can adjust the mouthpiece on the neck by pushing on to bring the note back in tune. Once the F is in tune to a tuner, the rest of the instrument will appear to be more sharp. Similarly, lowering the pitch of the notes in the lower stack will in effect raise the pitches in the top stack. Thus, one fix for a flat left hand is to lower the right hand. There are several ways to use crescents when tuning a saxophone and, with some ingenuity, one can do a good deal of tuning work with the crescents and key heights alone.
What I have outlined is the basics of tuning with crescents in saxophones. The repairers level of understanding and ingenuity will dictate how much can be done. In coming articles we will discuss tuning saxophones with bore modifications and neck modifications as well.
About the Author
Curt Altarac is a Saxophone Repair specialist, owner of MusicMedic.com, teacher and performer. Curt received his bachelor's degree in Music Education from S.U.N.Y. College at Fredonia and his Masters degree in Saxophone Performance from U.S.M.. He currently resides in Southport North Carolina and is active throughout the U.S. as a clinician and performer. You can contact Curt through his website www.MusicMedic.com.
Copyright © 2000-2012
MusicMedic.com
All Rights Reserved